 Skip to content
 In bug bounty hunting and web application penetration testing, having a strong and well-defined reconnaissance workflow is more important than just running random tools. Most security researchers fail to uncover high-impact vulnerabilities not because they lack skill, but because their recon process is unstructured. A proper recon workflow helps you systematically map the entire attack surface of a target, identify hidden assets, uncover undocumented endpoints, and detect misconfigurations before anyone else. Instead of relying on a single tool or performing shallow enumeration, modern reconnaissance in 2025 requires a layered and automated approach that connects subdomain discovery, asset validation, crawling, JavaScript analysis hunting, and vulnerability scanning into one continuous pipeline.
This guide walks you through a complete, real-world recon workflow used by professional bug bounty hunters and penetration testers to maximise coverage, reduce blind spots, and significantly improve the chances of finding critical security issues.
Phase 0: Pre-Recon Setup (Most Beginners Skip This)
Before running Subfinder, Assetfinder, or any other recon tool, most beginners make the same mistakes:
❌ They don’t configure API keys
❌ They run tools with default rate limits
❌ They burn their API quota
❌ They get blocked or receive incomplete results
Let’s fix that first.
1. Why API Keys Matter in Recon
Most subdomain tools rely heavily on external data sources.
Without API keys → Very limited results

Subfinder uses only a few public sources, so you may only see fewer subdomains.
With API keys → 5x to 10x more results

Depending on the target, you might suddenly find 50, 100, or even hundreds of subdomains.
Why?
API keys unlock premium passive sources such as: SecurityTrails, VirusTotal, Shodan, Censys, Quad9, BinaryEdge
These services maintain massive datasets containing DNS history, SSL certificates, WHOIS data, past IP allocations, and more. Subfinder pulls from all of these when API keys are configured.
2. How to Set Up API Keys
Example for Subfinder
Config file location: ~/.config/subfinder/provider-config.yaml
Example configuration:

If you want maximum subdomain coverage, configuring API keys is essential.
Apply the same API-key setup practice to all enumeration tools (Subfinder, Amass, etc.) by reviewing their official documentation.
3. Rate Limiting: Avoid Getting Banned or Throttled
Many sources enforce strict limits:
- VirusTotal → 4 requests/minute
- SecurityTrails → 300 requests/day
- Shodan → limited by plan
- Censys → very strict
Running tools too aggressively leads to: Temporary API ban, Quota exhaustion, Missing subdomains, Inaccurate results
4. Proper Rate-Limit Configuration
Instead of blindly running tools, use controlled settings:
Safe Mode Example:
subfinder -d target.com -rl 5 -t 30 -timeout 10Options:
- -rl → request rate (requests per second)
- -t → number of threads
- -timeout → timeout for sources
This ensures:
✅ No API bans
✅ Stable performance
✅ Better data accuracy
✅ Long-term usability
Now: Actual Recon Begins
After this preparation, we move into:
Subdomain Discovery → Validation → Crawling → JS Extraction → Secret Hunting → Vulnerability Scanning
Phase 1: Subdomain Enumeration

The first and most critical step in external reconnaissance is identifying all possible subdomains associated with the target. Hidden or forgotten subdomains often host outdated services, exposed dashboards, staging environments, or misconfigured APIs, making them prime candidates for high-impact vulnerabilities.
A strong subdomain enumeration process must combine multiple passive sources to achieve maximum coverage without sending direct traffic to the target.
1.1 Subfinder – Passive Enumeration from Large Data Sources
Subfinder is one of the fastest passive subdomain enumerators. It pulls results from dozens of sources (certificates, web archives, APIs, threat intel feeds, etc.).
Reference: GitHub – projectdiscovery/subfinder: Fast passive subdomain enumeration tool.
subfinder -d target.com -all -recursive -rl 5 -t 30 -o subfinder.txt1.2. Assetfinder – Quick Passive Enumeration
Assetfinder (by Tomnomnom) retrieves subdomains from major passive data sources. It’s lightweight and designed for quick recon pipelines.
assetfinder target.com > assetfinder.txtReference: GitHub – tomnomnom/assetfinder: Find domains and subdomains related to a given domain
1.3. Amass – Deep Passive Enumeration
OWASP Amass performs passive, semi-passive, and active recon, but here it’s used in passive mode for safe, broad asset discovery.
amass enum -passive -d target.com > amass.txtReference: GitHub – owasp-amass/amass: In-depth attack surface mapping and asset discovery
1.4. Combine & De-duplicate All Results
After gathering subdomains from all tools, merge and remove duplicates to form the most accurate master list. This can be done using a simple linux command –
cat subfinder.txt assetfinder.txt amass.txt | sort -u > all_subdomains.txtHere, it passively collects subdomains from multiple data sources using configured API keys, providing wide subdomain coverage without directly interacting with the target, removes duplicates, and saves the results into all_subdomains.txt.
Phase 2: Validate Live Subdomains and Technologies

After generating a complete subdomain list, the next step is confirming which hosts are actually alive, reachable, and serving content. Many discovered domains are dormant, expired, or misconfigured — testing these wastes considerable time and produces noise.
Live-host validation ensures every subsequent phase (vulnerability scanning, crawling, fuzzing, JS extraction) focuses only on active assets.
httpx (by ProjectDiscovery) is a fast, flexible probing tool that sends lightweight HTTP/S requests to identify live web services. It also retrieves metadata, including:
- HTTP status codes,
- Page titles
- Detected technologies (powered by Wappalyzer)
- Redirection paths
- TLS information
cat all_subdomains.txt | httpx -silent -status-code -title -tech-detect > alive.txtThis command identifies which subdomains are currently live by checking HTTP/S responses and filtering out inactive hosts, while also capturing useful context such as status codes, page titles, and technologies.
2.1 DNS Resolution + DNS Records Discovery (dnsx, dig, nslookup)
This step performs DNS resolution to identify which subdomains actually resolve to an IP address. DNS records reveal hosting infrastructure, cloud services, and relationships between assets. Subdomains with valid A/AAAA records can then be targeted for port scanning and service-based vulnerability scanning in later steps.
cat Alive.txt | dnsx -a -resp -silent > dns_results.txt2.2 Naabu (ProjectDiscovery) – Port-Based Liveness Detection
Naabu is a high-speed port scanner designed to detect exposed services by checking for open TCP ports—not just HTTP/S. This step highlights additional attack surfaces such as SSH, FTP, SMTP, Redis, MySQL, RDP, and other non-web services.
naabu -list dns_results.txt -ports full -silent -o naabu_alive.txt2.2 Nmap Vulnerability Script Scanning (NSE – vuln category)
Nmap’s NSE (Nmap Scripting Engine) includes a vuln script category that performs quick vulnerability checks against detected services. This step helps identify known service misconfigurations and CVE-related issues early in the recon process.
Tip: Many WAFs block Nmap’s default Mozilla/5.0 (compatible; Nmap Scripting Engine; https://nmap.org/book/nse.html) User-Agent. Use a custom one for cleaner scans. This avoids WAF blocking and improves response accuracy.
nmap -sV -Pn --script-args http.useragent="Mozilla/5.0" --script=vuln -iL dns_results.txt -oA nmap_vuln_scanReference: https://nmap.org/
Phase 3: Historical URL & Sensitive File Discovery (Dirsearch + WebArchive/CDX API)
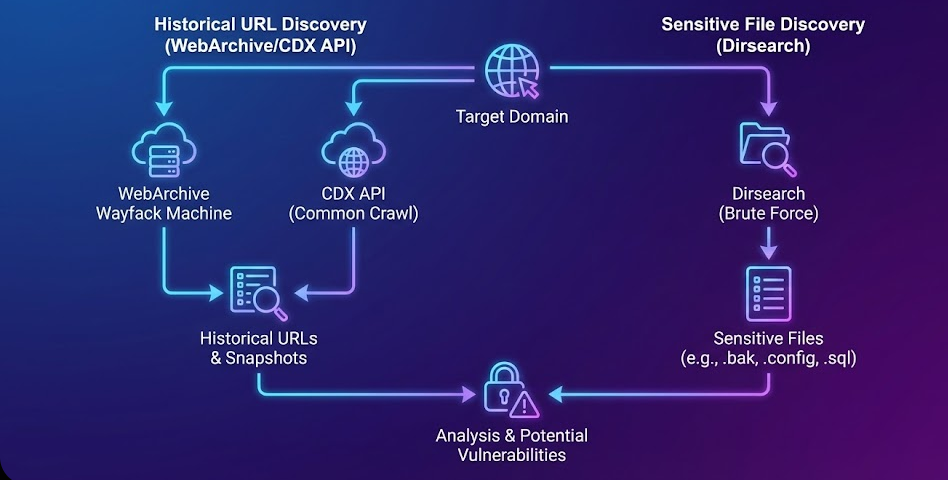
Here, it uncovers legacy content, old endpoints, deleted files, forgotten admin panels, exposed backups, and sensitive documents that no longer appear on the live application but remain archived on the internet.
Web applications frequently remove endpoints, update systems, and delete files but these assets often remain stored in public archives. The Wayback Machine, search engines, and archive services keep historical snapshots of URLs, which can expose: Old API endpoints, Debug pages, Backup files (.zip, .rar, .tar), Database dumps (.sql, .db), Internal documents (.docx, .pdf, .xlsx), Email leaks, Password leaks, Forgotten admin interface. These archived URLs often reveal high-value vulnerabilities that are completely invisible during live recon.
3.1 Directory Bruteforcing with Dirsearch
Runs directory brute-forcing against all discovered subdomains from subfinder, helping to find hidden directories, admin panels, APIs, and sensitive folders.
dirsearch -l subfinder.txtReference: GitHub – maurosoria/dirsearch: Web path scanner
3.2 Historical URL Extraction Using the WebArchive (Wayback Machine) CDX API
The CDX API is one of the most powerful passive reconnaissance sources. It provides a complete list of archived URLs for a domain and all of its subdomains. Using a browser becomes slow when listing thousands of URLs. CURL retrieves everything efficiently.
curl -G "https://web.archive.org/cdx/search/cdx" \ --data-urlencode "url=*.example.com/*" \ --data-urlencode "collapse=urlkey" \ --data-urlencode "output=text" \ --data-urlencode "fl=original" > output.txtIt downloads the complete archive of historical URLs into output.txt, making it easier to filter, search, and extract sensitive files.
Then, let’s filter the archived URLs to extract files with sensitive extensions such as database files, backups, spreadsheets, documents, and PDFs, all of which may contain highly sensitive leaked information.
cat output.txt | uro | grep -E '\.xls|\.xml|\.xlsx|\.json|\.pdf|\.sql|\.doc|\.docx|\.ppt|\.zip|\.rar|\.db'Phase 4: Vulnerability Scanning on Live Hosts

Large attack surfaces cannot be manually tested immediately. Automated scanning helps quickly highlight critical or high-risk hosts that deserve deeper manual analysis. Here, this phase identifies known and common vulnerabilities automatically, acting as a fast triage layer across all live assets.
4.1 Fast Vulnerability Scanning with Nuclei
Nuclei is a rapid, template-driven scanner from ProjectDiscovery. It covers thousands of vulnerability types, including CVEs, misconfigurations, SSRF, RCE, exposed services, cloud config flaws, and more. Ideal for wide, fast triage of large target lists.
cat alive.txt | nuclei -t /path/to/templates/ -o nuclei_results.txt4.2 Deep Vulnerability Scanning Using Nessus or Other Automated Scanners
While Nuclei excels at speed and coverage, Nessus, Qualys, and OpenVAS perform deeper, heuristic-based analysis using large vulnerability plugin databases.
Export alive.txt into the Nessus target list, and run the Web Application Scan profile. It provides detailed vulnerability results from a well-maintained vulnerability database, including network-level issues that Nuclei may not detect.
Phase 5: JavaScript File Extraction & Secret Hunting

Modern web applications store critical logic, APIs, and sensitive data inside JavaScript files. This phase expands the attack surface by extracting and analysing those JavaScript assets. Hidden endpoints, internal APIs, secrets, and cloud configurations are frequently exposed through JavaScript files. Ignoring JavaScript analysis means missing high-value entry points.
5.1 Extract JavaScript Files using Katana
Katana is a powerful crawler from ProjectDiscovery. It crawls live targets and extracts JavaScript file URLs, including dynamically loaded scripts.
katana -list alive.txt -jc -jsl | grep -oE '\.js($|\?)' > js1.txtReference: GitHub – projectdiscovery/katana: A next-generation crawling and spidering framework.
5.2 Extract JavaScript using GoSpider
GoSpider variants are popular for deep crawling and pulling JS files that other crawlers miss and widely used crawler implementations and forks provide options for headless/crawling depth and integration with other tooling.
gospider -S alive.txt -c 10 -d 0 -t 20 --other-source | grep -oE 'https?://[^[:space:]]+' \ | grep -E '\.js($|\?)' > js2.txtReference: Gospider – Fast web spider written in Go
5.3 Detects sensitive information using Nuclei
Nuclei is a template-driven vulnerability scanner. Use community/official JS templates to scan downloaded JS files for common secret patterns, cloud-config leaks, tokens, etc.
cat final_js.txt | nuclei -t js-templates/ -o js_leaks_report.txtThese leaks regularly lead to critical vulnerabilities. It scans JavaScript files for exposed secrets like API tokens, cloud credentials, OAuth details, and Firebase configurations.
5.4 Active & Passive Secret Monitoring using JSMon
After completing passive JavaScript reconnaissance, the extracted final_js.txt file can be uploaded to the JSMon platform, which is on JavaScript security platform that provides monitoring and scanning for JS assets. The jsmon-cli lets you upload lists or integrate scanning into pipelines and workspaces. Which identify Hardcoded secrets, Exposed API keys and tokens, Sensitive configurations, Misconfigured S3 buckets, Npm Takeover, GraphQL / API Endpoints.
jsmon-cli -d Redacted.com -wksp <WORKSPACE_ID>Reference: Jsmon
5.5 Deep Secret Extraction with SecretFinder
SecretFinder (python) is based on LinkFinder; it beautifies JS and uses large regex sets to find potential API keys, tokens, JWTs, etc. It can output plaintext or HTML and is commonly used in JS recon pipelines.
cat final_js.txt | | while read url; do python3 SecretFinder.py -i $url -o cli >> secrets.txt; done5.6 JS parsing & extraction with LazyEgg
LazyEgg is a JS-focused extraction tool that can pull links, JS URLs, localStorage content, and leaked credentials; it also includes a Chrome extension for real-time JS logging. It’s useful for richer client-side data collection and live-browser captures.
cat final_js.txt | xargs -I{} bash -c 'echo -e "\nTarget: {}\n" && python lazyegg.py "{}" --js_urls --domains --leaked_creds'Reference: GitHub – schooldropout1337/lazyegg
Recon is not just the first step in bug bounty; it’s the foundation of everything you’ll find later.
When you stop relying on luck and start relying on a structured workflow, your results change completely.
This layered approach is what separates guesswork from real exploitation. Over time, this methodology will help you move from finding random bugs to uncovering high-impact, report-worthy vulnerabilities with confidence.